A blog about restaurants and recipes that help me go the extra mile, including lots of frosting and too much baking!
Saturday, December 24, 2011
No better gift then Granola Crunchy Goodness.
I haven't been posting about all of the batches.....but I have been making granola a lot lately! A lot. One week I made a batch, ate it rapidly over only a couple days and then wished it wasn't all gone and made a second batch 3 days later! So while I was on a roll, I talked the fam into making some batches to give away for Christmas gifts.
Cranberry Nut Granola
Ingredients:
- 3 cups rolled oats
- 1 cup slivered almonds
- 1 cup chopped walnuts
- 1/4 cup brown sugar
- 1/4 cup maple syrup
- 1/4 cup vegetable oil
- 3/4 teaspoon salt
- 1 cup dried cranberries
Directions:
1. Preheat the oven to 250 degrees.
2. In a large bowl, combine all dry ingredients.
3. Add in wet ingredients and mix to coat all oats thoroughly.
4. Pour mixture onto sheet pan
5. Cook for an hour and 15 minutes, stirring every 15 minutes.
6. After you remove it from the oven let granola cool before adding cranberries.
Wednesday, December 21, 2011
Yet another cupcake review
In the hunt for the best cupcake, I’ve always wanted to try LA’s claim to fame, Sprinkles. I was just talking about it yesterday, so I was super stoked when the opportunity fell into my lap when a box was brought into work today!!!
They were delicious, BUT New York definitely still gets my vote for doing a better cupcake. A variety was brought in and I made sure to get claims on a vanilla. The cake was nice and moist and did have a nice taste to it. Frosting is my favorite part, but the cake is where things can go extremely wrong. The cake should taste good enough on its own to not need frosting. Sprinkles made a good showing in this department. They only have a layer about 1/8” thick of frosting which is just not enough in my book.
They are definitely scrumptious and I wouldn’t think twice about buying some of them, but Crumbs of New York, and Sweet Tooth of Southie are definitely still way higher on my list!
Tuesday, December 20, 2011
Candy Cane Milkshake
'Tis the season to be eating too many sweets. Fa la la la la la la la la!
Candy Cane Milkshake at Big Daddy's to fill the peppermint stick ice cream craving. Ate with a spoon!
Monday, November 28, 2011
Cornbread Mishap
It has been a little while since I've made cornbread. I was on the hunt for awhile to find the best recipe. The hunt is still on, but I have taken probably an 8 month hiatus from attempting. Today I made a batch which called for sour cream to use up this ingredient I would never use otherwise.
The cornbread came out decent (still nothing to write home about) but when taking it out of the pan, I had a huge mishap!
I didn't want to scrape the pan, so I just kind of loosened the sides and then flipped the pan thinking it would slip right out. Not the case. Instead I was left with a pile of cornbread and half still in the pan. This made for awkward slices!
Here is the recipe, although I must say, I will still be trying others. It wasn't super moist, but it wasn't dry. It could use a little more taste though....extra salt? extra sugar?
Ingredients:
- 1 cup all-purpose flour
- 1 cup cornmeal
- 1/4 cup sugar
- 1/2 teaspoon baking powder
- 1/2 teaspoon baking soda
- 1/2 teaspoon salt
- 1 egg, lightly beaten
- 1 cup sour cream
- 1/3 cup milk
- 1/4 cup butter, melted
Directions:
1. Preheat the over to 400 degrees
2. In a large bowl, combine the flour, cornmeal, sugar, baking powder, baking soda and salt.
3. In a separate bowl, mix together the egg, sour cream, milk and butter.
4. Combine the wet and dry ingredients.
5. Pour into pan and bake for 20-25 minutes or until middle is cooked all the way through.
Sunday, November 27, 2011
Broccoli-Basil Mac and Cheese
Today I got to cook for my family. Cooking for one gets old. I feel I don't cook quite as many cool dishes because of this restriction.
On the menu today was Broccoli-Basil Mac and Cheese found by my sister here. It came out quite good. I followed her recipe and used Gruyere which worked, but I think next time I would try mixing it up with a different cheese.
Here's the recipe:
Ingredients:
- 1 acorn squash, peeled, seeded, and cut into small chunks
- olive oil
- 1 bunch of basil, stems removed
- 2 slices wheat bread, stale or dried out in the oven
- 1/2 a small head of broccoli, roughly chopped
- 4 tablespoons sour cream
- 1 3/4 cups grated white cheddar cheese
- 1 3/4 cups grated gruyere cheese
- handful of cherry tomatoes
- 3 cups (whole wheat) macaroni elbows
Directions:
1. Preheat your oven to 400F with a rack in the middle.
2. Put a large pot of water on to boil.
3. Peel and chop up squash. Place on a large baking sheet, drizzle with a bit of olive oil, sprinkle with salt and pepper, and bake for about 20-25 minutes, or until golden.
4. In a food processor pulse half the basil, all of the bread, the broccoli and a little olive oil. Set mixture aside in a small bowl.
5. In a separate bowl, combine the sour cream and grated cheeses.
6. Blend the cherry tomatoes and remaining basil in the food processor then add this mixture to the sour cream and cheese.
7. Cook pasta for a bit less time than the package suggests. Drain, reserving one cup of the hot pasta water for later use.
8. Return the hot pasta to the pan and add the cheese mixture and then the squash. Add pasta water to thin the sauce to the consistency of cream. It should be a little watery, since it will get soaked up when baking.
9. Transfer to a large casserole dish and top with the green breadcrumb mixture.
10. Bake for 20 -25 minutes or until the topping is crunchy.
11. Remove from the oven, and wait 10 minutes before serving.
It came out great and everyone seemed to like it very much!
Friday, November 25, 2011
Thankful
There's a place....there's a place. In outer space......in outer space.
This was a non-traditional Thanksgiving Day, but a good one none the least. I worked and wasn't with my family.......But will be seeing them tomorrow and we will have our celebration just a day late. Today, instead I got to catch some glimpses of the parade while snug inside away from the crowds and then dined on some amazing food made by chef Dan with friends. His culinary expertise shown through.
He made amazing cornbread stuffing, which blew away my sad attempt from last year. Thanksgiving 2010, my sis and I cooked, while my mom worked. It was really fun preparing the whole meal. This was prior to my blog direction, so I didn't post about it. Let's just say stuffing is maybe my favorite part of the meal and ours came out pretty blant and I was super disappointed. Dan's was AMAZING. I watched him cook like I was watching the food network. It was awesome!
Mashed were amazing as well. Turkey was super moist and flavorful and covered with a herb butter spread.
The spread!
Emily's pumpkin pie!
Oh and verdict on my new crust: tastes great! My pie was a HUGE hit!
Wednesday, November 23, 2011
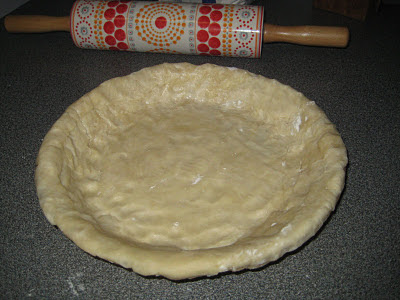
My pies just got a makeover!
Isn't it pretty?
My pies and quiches taste awesome. Homemade crust makes them, but although mine taste really good, they don't look that good. They also crumble quite easily. Whenever I would travel a piece of quiche to work, during the journey the side of the crust totally falls off. Beverly at work used to take out her lunch and have exquisite pieces of quiche with beautiful in tact crust.
I inquired and she shared her secret. Vodka Pie Crust.
The alcohol cooks off, so you don't have to worry about getting tipsy off your pie. Their is something magical about the alcohol which really holds things together.
Today I was making yet another apple pie in prep for Thanksgiving. I decided to try her crust out. It looks so much prettier and seems to be far less crumbly. Success! Thanks Bev!
Ingredients:
- 2 1/2 cups all-purpose flour
- 1 teaspoon table salt
- 2 tablespoons sugar (to be omitted for quiches)
- 12 tablespoons (1 1/2 sticks) cold unsalted butter, cut into 1/4-inch slices
- 1/2 cup cold vegetable shortening, cut into 4 pieces
- 1/4 cup cold vodka
- 1/4 cup cold water
Directions:
1. Mix 1 1/2 cups flour, salt, and sugar in until combined
2. Add butter and shortening and mix until dough just starts to collect in uneven clumps and all flour is coated.
3. Mix in remaining cup of flour
4. Sprinkle vodka and water over mixture and continue mixing. Dough will be slightly tacky and stick together.
5. Divide dough into two even balls and flatten into disks. Wrap each in plastic wrap and refrigerate at least 45 minutes (or up to 2 days)
6. Remove from fridge and roll out!
Here are more pics of apple pie making, not that I haven't already posted about this one!
Hope everyone loves this pie tomorrow!
Tuesday, November 22, 2011
Cherry Pie Lara Bars
I love Lara Bars. I even got my mom obsessed with them. I’ve been meaning to do this forever…..
Finally, I made some homemade ones. It is super easy and they taste exactly like Lara’s! I mean how could they not be easy to make? They each have only 3-5 ingredients, so you can basically use that list to develop a recipe.
Today I made Cherry Pie Bars. I can’t wait to try making other varieties.
Ingredients:
1/2 cup Dried Cranberries
1/2 cup Seedless/Pitted whole Dates
2/3 cup Almonds (unsalted)
1 1/2 tsp cinnamon
Directions:
1. Place the dates and cherries in a food processor and blend until fully combined.
2. Transfer blended dates and cherries to a bowl.
3. Place nuts into the processor and blend until chopped fairly small
4. Add the nuts and cinnamon to the bowl with the fruit paste.
5. With your fingers, mix the nuts into the paste until all is combined into a ball.
6. Move ball to clean surface. Cover with plastic wrap and use rolling pin to make flat sheet of the mixture
7. Cut into bars and wrap in plastic wrap for storing.
This recipe made me 9 bars, plus some scraps for taste testing. Enjoy!!!
Sunday, November 13, 2011
Vegetarian Chili
When it starts getting cold out there is something really nice about having a bowl of chili to warm yourself up with. It is also a great thing to make to supple yourself with multiple meals for the week! And this dish I feel taste even better the next day because the flavors have had more time to seep in. I have made many variations of vegetarian bean chilis and have yet to post one, so here goes. I drew my inspiration from Martha, but changed up beans and veggies I had on hand.
Ingredients:
- 1 tablespoon olive oil
- 1 small onion, diced
- 2 garlic cloves, minced
- dash of salt and ground pepper
- 1 zucchini, halved and thinly
- 2 carrots, thinly sliced
- 2 stalks of celery, thinly sliced
- 1 tablespoon chili powder
- 1 teaspoon ground cumin
- 1 can of black beans, rinsed and drained
- 1 can of red kidney beans
- 1 can crushed tomatoes
Directions:
1. In a pot, heat oil over medium-high.
2. Add in onion and garlic and cook for about 4 minutes, stirring occasionally, and adding salt and pepper to season.
3. Add in zucchini, carrots, chili powder, and cumin. Cook until veggies are tender, about 6 minutes
4. Add in beans, tomatoes, and 1 cup water.
5. Simmer for about 10 minutes.
6. Enjoy!
I usually have corn in there too, but I didn't have any in the freezer. I like eating this over rice and topping it with shredded cheese!
Monday, October 31, 2011
Happy Halloween and Happy Apple Season!
What do I love about the fall most? After the running weather....Apples.
Apple picking, Apple pie, Apple Cider, Cider Donuts
Hurricane Irene cut the apple picking season short this year.......No annual trip to Fishkill happened. Soooooooooo we just went to the farmer's market and bought apple and pretended we had just picked them and then continued the tradition of apple pie baking.
Same lovely recipe as last year!
Sunday, October 16, 2011
Lemon Poppyseed Cookies
I bought poppy seeds back in June to make muffins and as much as I love muffins, I felt like putting them to a different use with this cookie recipe. If you are a lemon lover, you will love these cookies and their tanginess.
I made this delectable recipe, which was a hit at the Fat Kid's Club meeting, aka Sheena pot luck birthday party.
Ingredients:
- 1/4 cup fresh lemon juice
- 3 1/2 teaspoons lemon zest (2 to 3 lemons)
- 2 sticks unsalted butter
- 2 cups all-purpose flour
- 1 teaspoon baking powder
- 1/2 teaspoon salt
- 1 1/2 cups sugar
- 1 large egg
- 2 teaspoons pure vanilla extract
- 1 tablespoon poppy seeds
Directions:
1. Preheat your oven to 375 degrees.
2. Simmer lemon juice in a small saucepan over medium heat; cook until reduced by half and then add 1 stick of butter; stir until melted.
3. In a large bowl, whisk together flour, baking powder, and salt.
4. In a separate bowl, cream remaining stick of butter and 1 cup sugar with an electric mixer.
5. Mix in egg and lemon butter. Mix for about 3 minutes.
6. Then add in vanilla and 2 teaspoons zest.
7. Finally add in flour mixture and poppy seeds.
8. Stir together remaining 1/2 cup sugar and 1 1/2 teaspoons zest. Use this to roll spoonfuls of dough in before putting them on cookie sheet.
9. Cook for approximately 11 minutes.
Martha Stewart is to thank for this recipe!
Monday, October 3, 2011
Maple Almond Granola
I love making homemade granola. The first time I ever made it, I followed Alton Brown’s recipe (minus the coconut.) It was amazing. It is super sugary and almost too candy like; right up my alley! Since then when make it, I don’t go to great lengths to measure things. I kind of just throw a bunch of crap in and test it to make sure it tastes good and then cook it up.
One thought I must share from my experimenting: I usually use honey because it is way cheaper then maple syrup, but man, maple syrup makes for an even tastier glue! This batch got its extra scrumptious base thanks to Leslie’s bridal shower favor.
I made a batch today, which came out tasty as always. Here’s the run down:
Ingredients:
- 4 cups rolled oats
- 1 cup slivered almonds
- 1/2 cup sesame seeds
- 1/4 cup wheat germ
- 1/4 cup brown sugar
- 3/4 teaspoon salt
- 1/4 cup vegetable oil
- 1/4 cup maple syrup
Directions:
- Preheat the oven to 250 degrees.
- In a large bowl, combine all dry ingredients.
- Next add in wet ingredients and mix to coat all oats thoroughly.
- Pour mixture onto sheet pans or anything you have the has sides, so mixture won’t pour out into your oven. I made do with 4 pie pans!
- Cook for an hour, stirring every 15 minutes.
- After you remove it from the oven, you can add any dried fruit you desire!
Tuesday, September 20, 2011
Guac heaven
When someone raves about a restaurant, I must go. Awit told me about this Mexican restaurant, Chavella's which he argued to be the best Mexican food ever. The way he described it at length had me dreaming about eating their tacos. On my day off this week, I met Chantale there and introduced her to a lovely new eating establishment she lives nearby.
I adored this place. They recently moved to a new bigger location. I’m not sure what the old place looked like, but the décor here was super amazing. The walls were brick and all the furniture was rustic old wood tables and benches. To off-set the darkness, the bar was covered with bright colored painted tiles. My favorite part was the amazing decorative tin ceiling.
We split the guacamole, which was the bomb. Literally one of the best I’ve ever had. It came with very fun flat tortilla to dip in rather than your standard chips.
They have really great lunch specials, so dining at lunch time was such a great deal. I got a taco and quesadilla combo. Both were super delish: Rajas Con Queso quesadilla, which was poblano peppers, caramelized onions and queso Oaxaca and Chipotle Chicken taco, which was chicken, tomatoes, sweet onions, lettuce and avocado.
I had never been to this area in Brooklyn, so after eating we walked around a little. I love exploring new areas. It is quite far from me so unfortunately I will probably not be dining here quite often, but will definitely return at some point.
Thursday, August 25, 2011
Kale chips!
At a ridiculous hour on a late night stuck in the office during fashion week, one of my co-worker's then chef boyfriend prepared some food for us. He did not like the fact that we were being rationed string cheese and honey wheat pretzels. He brought in the fanciest food I think the office had ever seen. One thing on the menu was kale chips. I really liked these and he explained to me how easy they were to make. I waited quite sometime to try them myself.
I mad a couple batches and am really into them. The one thing is that they don't seem to keep very crispy, so you must eat them all….or share!
(This pic looks like nothing, but I don't like not providing a visual!)
Ingredients:
-bunch of kale
-1 tablespoon of olive oil
-salt and pepper
Directions:
1. Preheat the oven to 350.
2. Wash kale and dry.
3. Remove stems and tear into chip size pieces.
4. Drizzle with olive oil and sprinkle salt and pepper on top
5. Bake for about 12 minutes or until leafs get crunchy.
Sunday, August 7, 2011
Lemon-Buttermilk Popsicles
After returning from my trip to Nashville last summer and ODing on las Paletas, I went on a kick of trying to make a good popsicle.
I made numerous attempt of making mediocre unsatisfying popsicles until I found this gem of a recipe. Basically I feel that when popsicles are made they flash freeze them because the consistency is quite different. Using a standard freezer, popsicles come out with an icicle. As you lick them the juice comes out and you are left with a plain ice cube. This creamy lemon popsicle has a way better consistency. The recipe calls for buttermilk which when frozen doesn't get quite as hard allowing for great popsicles!
Here is the recipe:
Ingredients:
- 3/4 cup sugar
- 5 tablespoons fresh lemon juice
- 2 tablespoons grated lemon peel
- Pinch of salt
- 1 2/3 cups buttermilk
Directions:
- Whisk sugar, lemon juice, lemon peel, and salt until sugar dissolves.
- Add in buttermilk.
- Pour mixture into 8 ice pop molds
- Cover and freeze until firm
(It is best to have dessert already planned for that night because you will have to wait until the next day or at least 4 hours to enjoy!)
This recipe comes from Bon Appetit and the original can be found here.
Tuesday, August 2, 2011
Madison, Wisconsin: Scrumptious Weekend
A paid a visit to my aunt and uncle out in Madison, Wisconsin last weekend. I ate some amazing food while there and most importantly paid a visit to a cheese factory!
This was my big request for the weekend and Tom made sure I got my dream! We drove to Cedar Grove outside of the city, which was a lovely drive through the country. I was basically enjoy every minute of being out in farm land away from the craziness of the city!
Making cheese is a lengthy process. We got to see them at the point when cheese curds have formed and were being mixed in a big vat. They had just added salt to slow down the acid from breaking it down any further.
From there, the curds will be smooshed down, formed into blocks, cut up, and packaged! In the store, I sampled cheese curds for the first time. They are very rubbery and squeaky as they described them. They tasted fine, but I really didn't like the rubberiness. I'm going to stick to regular old cheese.
Also this weekend, I got to go to the largest producer only farmer's market in the country. Every Saturday local vendors line the square around the Capital. Everyone walks counter clockwise. It is the rule and I'm pretty bad things will happen to you if you don't oblige!
Like my love for grocery stores, I could just walk around this place for hours. I just wished I could have traveled some delectable goodies home. They had huge bunches of basil for dirt cheap I wanted to get super badly.
Here are some images from the market:
Beautiful tomatoes.
Radishes.
Fun shaped squash.
Kohlrabi? I'm unfamiliar with this vegetable!
Subscribe to:
Posts (Atom)